When making a more fully-featured game in Godot, I often find myself needing to create a cutscene which displays an image and some text.
I typically lay this out with the image taking the top 2/3 or 3/4 of the window, and a black box taking up the bottom remainder. Inside this box is where I place the name of who is speaking and the text.
In this post, I will be showing off the way I do this.
I am in no way saying this is the best, or the only, way to achieve this. It's just the way I came up with.
The Cutscene scene
The first thing I do is create a scene which will be able to draw the dialogue box over the top of another scene. I tend to save this as res://scenes/cutscene.tscn.
The scene may look like so:
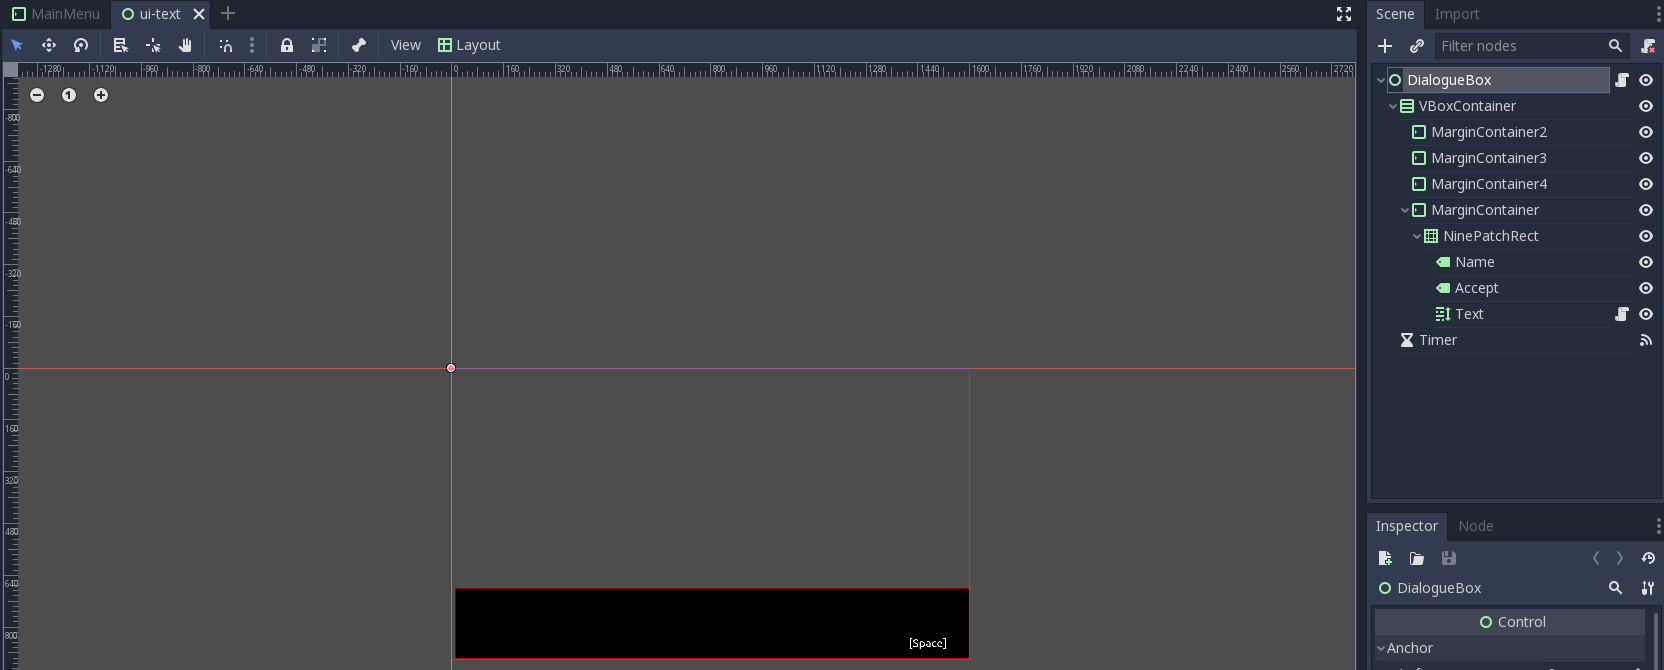
The root of this scene is a Control node, and it has two children - a VBoxContainer and a Timer.
The VBoxContainer has its Margin Right set to the width of the game window, and its Bottom set to the height. Its Size (inside Rect) is also set to the width and height of the window.
Inside the VBoxContainer are 3 or 4 MarginContainer s. Under Size Flags both Horizontal and Vertical are set to Fill, Expand.
The bottom MarginContainer has a child NinePatchRect which will act as the background for the dialogue text.
Since it will be displaying text, there are three children of this NinePatchRect - two Label nodes and a RichTextLabel.
The top Label will display the talker's name, and the bottom will display some text letting the user know that they can press a key to advance the cutscene. In this case, you can see in the image above that there is a hint to press Space. This will appear once all text in the current chunk has displayed.
That RichTextLabel is what will be used to animate the displaying of dialogue.
Finally, that Timer is set to 0.01, with Autostart on and One Shot off.
That's the nodes set up, no we shall dig into the script which lets it function.
The Cutscene Script
This first script is assigned to the root Control node.
extends Control

signal finished_displaying

onready var TIMER = $Timer
onready var NAME = $VBoxContainer/MarginContainer/NinePatchRect/Name
onready var TEXT = $VBoxContainer/MarginContainer/NinePatchRect/Text
onready var ACCEPT = $VBoxContainer/MarginContainer/NinePatchRect/Accept

var listening = false

func _ready():
    ACCEPT.visible = false
    TIMER.connect("timeout", TEXT, "_on_Timer_timeout")

func _process(delta):
    if listening:
        if Input.is_action_just_released("ui_accept"):
            ACCEPT.visible = false
            TEXT.visible_characters = 0
            self.visible = false
            listening = false
            emit_signal("finished_displaying")

func set_name(name):
    NAME.text = name

func set_text(text):
    TEXT.text = text

func display_text():
    TIMER.start()

func show_dialogue(name, text):
    self.visible = true
    listening = false
    ACCEPT.visible = false

    set_name(name)
    set_text(text)
    display_text()

func dialogue_finished_callback():
    TIMER.stop()
    ACCEPT.visible = true
    listening = true
After grabbing shorter references to the Labels we have a few basic functions allow for the setting of the name and dialogue text. We hide the Accept label (The one which says [Space] in the image above) and tell the script not to listen for a keypress by default.
When a scene wishes to show some dialogue, it calls the show_dialogue method with the speaker's name and what they are saying. This causes the Cutscene scene to become visible, set the name of the speaker and their words, then starts the Timer.
The Timer node is linked to a function on the RichTextLabel which will show the next character of text every time the timer counts down (every 0.01 seconds).
The RichTextLabel Script
extends RichTextLabel


func _on_Timer_timeout():
    if visible_characters < get_total_character_count():
        visible_characters = visible_characters + 1
    else:
        get_parent().get_parent().get_parent().get_parent().dialogue_finished_callback()
Once the timer has ticked down enough times that every character has been displayed, the Control node has its dialogue_finished_callback method invoked, which stops the timer and sets it to listening.
While listening, the "[Space]" text is displayed, and the scene listens for the "ui_accept" key to be pressed. Once it is detected, the dialogue scene is torn down to its beginning state and a signal "finished_displaying" is emitted.
But what does this signal do? Well, it is linked to a global function which allows all scenes to use this Cutscene.
The Global Functions
To set up a global script in Godot, head to Project > Project Settings > Autoload, then set the name and path to your global script. You can now access it from any other script by its name.
var frames = []


func tie_together_frames():
    frames.remove(0)

    if len(frames) < 1:
        return

    var current = frames[0]
    if not current["target"].is_connected("finished_displaying", self, "tie_together_frames"):
      current["target"].connect("finished_displaying", self, "tie_together_frames")
    current["target"].callv(current["method"], current["args"])


func animated_scene(structure):
    # structure is
    # {target: [method, arg1, arg2, ...]}
    # Every animation must emit finished_displaying upon completion to be included in this chain

    frames = structure

    var current = frames[0]

    current["target"].connect("finished_displaying", self, "tie_together_frames")

    # begin executing the chain by calling the first item's method
    current["target"].callv(current["method"], current["args"])
Our global script holds an array of "frames". Each frame is a dictionary with three essential components:
- "target": The class instnace which will be executing a method
- "method": The method to call on this class (as a string)
- "args": An array of argument values for the given method.
Each of these methods must emit a signal of "finished_displaying" in order for the chain of frames to connect.
The goal of animated_scene is to provide a starting point for the chaining together of the provided methods. It sets the global frames variable to the provided structure, then connects the first method call to the tie_together_frames global function, before finally calling the first method.
Once that first method emits "finished_displaying" the tie_together_frames function will be invoked.
This function pops the front method from the frames array (the one which was just called) then checks if there are still more to call.
If there are, it will tie the "finished_displaying" signal to itself before calling that method.
This repeats until there are no more frames left to call.
Using the animated_scene method
In any scene which wants to display a dialogue cutscene, just add a CanvasLayer node with a child instance of the Cutscene scene. This ensures that your dialogue box will always be on top of any other assets.
Then in your script, grab a reference to the Cutscene instance and pass its show_dialogue method on over to animated_scene
func _ready():
    var CS = $Cutscene

    global.animated_scene([
        {"target": CS, "method": "show_dialogue", "args": ["Character One", "Hello!"]},
        {"target": CS, "method": "show_dialogue", "args": ["Character Two", "Hi!"]},
    ])
Since the animated_scene function works with any class which will emit "finished_displaying", you can use it with methods other than the Cutscene's show_dialogue, too.